<![CDATA[PND4]]>2017-01-02T22:29:14-08:00http://www.pnd4.net/Octopress<![CDATA[Peekaboo!]]>2017-01-02T21:52:33-08:00http://www.pnd4.net/blog/2017/01/02/peekabooI know its been a long time between posts; Im not dead! To celebrate heres something you can use with your FiOS router.
#!/bin/bash
while true
do
    ./devices.sh | cut -d, -f 6-7,12,14,16 | egrep -i -e '<MAC or Vendor-Prefixes to look for>'
    if [ $? -eq 0 ]
    then
        echo -e "\a\n\n\nret[$?] -- DEVICES FOUND !!\n\n\n" && \
            /usr/bin/mpg123 -q $HOME/.sounds/peanutbutter-jelly-time.mp3
        break
    else
        echo "ret[$?] -- $(date +%H:%M:%S) - Devices not found.."
        sleep 3
        clear
    fi
done
I'll elaborate in the near future. Have fun!
]]><![CDATA[JSON-RPC + Kodi = BFFs]]>2015-05-01T05:52:21-07:00http://www.pnd4.net/blog/2015/05/01/json-rpc-plus-kodi-bffsThe can of worms.
The other night I decided to do the long-overdue update of my Gentoo install on my netbook which serves as my XBMC machine. As expected, something along the way broke and XBMC's dependency, ffmpeg, failed to build. After a long struggle, I gave up on the XBMC ebuild and went with XBMC's successor, Kodi. Making haste, I neglected to enable any of Kodi's optional USE-flags. The result: everything perfect Kodi-side (faster actually), but my various remote-control browser-addons, mobile apps, and scripts were made useless.
Meet Kodi's fwiend, JSON-RPC
For months now I've been using a script called xbmc-play. It was simple to use, and lightweight. Problem is that, like most XBMC/Kodi remotes, the underlying mechanics that handle the communication required the webserver feature on the Kodi machine. Since I know a fair amount about scripting and very little of building extensions for browsers and Android apps, scripting became the first part of this journey to regain remoting ability.
In first discovering the lack of a webserver, running netstat -tuanp confirmed no process was listening on the defaut port 8080. The listing did reveal that after enabling "Allow programs on other systems to control Kodi" it listens on port 9090. And a quick google of Kodi's relation to this port will tell you that the JSON-RPC protocol is what's understood on Kodi's end.
First Impression
Looking over the JSON-RPC API articles at the Kodi Wiki and it's official documentation you can get ideas about the syntax of these 'requests' the commands have to make and go from there.
Prior experience manually interacting over TCP/IP came in handy. I was quickly able to test some prototype requests with Kodi using the wiki-suggested telnet tool. Ultimately, I chose to work with netcat as it seemed more fitting for use in the resulting script that follows:
#!/bin/bash## YouTube Kodi Script [http://github.com/pnd4/kodi-play] #by pnd4 ## - Portions from "YouTube XBMC Script" by Tom Laermans [tomlaermans.net]. # This script is (also) released into the public domain.# - Description: Uses Kodi's native JSON-RPC to play YouTube content remotely# without need for the webserver.# - Requires: netcat (tested with GNU Netcat)# - Usage: kodi-play < URL | YouTube-ID ># - ex: kodi-play hABj_mrP-no## Configure Kodi's RPC details hereKODI_HOST=gen2
KODI_PORT=9090
## Don't touch anything under hereREGEX="^.*((youtu.be\/)|(v\/)|(\/u\/\w\/)|(embed\/)|(watch\?))\??v?=?([^#\&\?]*).*"ID=$1if["$ID"==""];thenecho"Syntax $0 <id|url>"exitfiif[[$ID=~ $REGEX]];thenID=${BASH_REMATCH[7]}fi# Sends our JSON-RPC request to Kodi, and closes the connection.function jrpc_req {echo -n "$1" EOF | nc -c $KODI_HOST$KODI_PORT;}echo -n "Opening video id $ID on $KODI_HOST ... "jrpc_req '{"jsonrpc": "2.0", "method": "Playlist.Clear", "params":{"playlistid":1}, "id": 0}';jrpc_req '{"jsonrpc": "2.0", "method": "Playlist.Add", "params":{"playlistid":1, "item" :{ "file" : "plugin://plugin.video.youtube/?action=play_video&videoid='$ID'"}}, "id": 0}';jrpc_req '{"jsonrpc": "2.0", "method": "Player.Open", "params":{"item":{"playlistid":1, "position" : 0}}, "id": 0}';echo"Done."
What's Next
Having got to dabble into communicating with Kodi over JSON-RPC and being with met less trouble than success. I'm thinking about pursuing a desktop application or at least framework for controlling Kodi/XBMC. It would certainly fulfull my need, and maybe help someone else looking for remote-control without the need for a excess bloat services like a webserver or unnecessary consumption of resources client-side from yet another browser-addon.
With the advent of compact low-powered embedded systems, people seem forget to leverage the power of older systems largely in part due to resource limitations. My netbook, for instance, at most can have 2GB of RAM. Modern machines come with at least 4GB these days, but modern applications like Chrome are quick to claim it. If we choose to design our systems and their appilcations intelligently life won't necessarily be over for such devices like my netbook and won't be for some time as long as we remain resourceful as users and continue to keep modularity in mind as developers.
]]><![CDATA[Creating a PKGBUILD for lzo-2.08 on ArchLinuxARM]]>2014-07-02T06:41:41-07:00http://www.pnd4.net/blog/2014/07/02/creating-a-pkgbuild-for-lzo-2-dot-08-on-archlinuxarmUsing ArchLinuxARM with OpenVPN broke on my PogoPlug e02 after lzo2 was updated from 2.06-3 to 2.07-2 a few days ago. After another ALARM user confirmed the issue, a couple days passed without a solution and downgrading to 2.06-3 not only is bad practice due to "CVE-2014-4607" but paper-thin, since its disappearing from repos and its likely it won't be in your local package cache forever.. Fueled by boredom, I decided to fix the problem myself.
Using 2.07-2 as a base
Copied PKGBUILD for lzo2-2.07-2 from ABS.
Changed 'arch' to suit ALARM.
Deleted the stuff regarding 2.07 (patch: src, checksums).
Changed pkg version and release values from '2.07-2' to make '2.08-1' respectively.
Making it work
Seems like adding CFLAGS="-DLZO_DEBUG" before ./configure .. made the difference whether it built or not.
Maintaining Security?
However setting the CFLAGS environment variable showed a warning that if not using at least "-O" ("-O2" being the default makepkg.conf optimization CFLAG) then it would not use "-DFORTIFYSOURCE=2" which sounds important from a security-minded perspective.
Looks like the best option would be to disable 'FORTIFYSOURCE' but still maintain the highest level of security otherwise and retain the ability to protect from stack-smashing attacks by setting 'stack-protector-all'. It seems with 2.08 we have only two choices: "-O0" or no optimizations at all. Personally, I'd gladly sacrifice runtime-speed optimizations for security, when having both is not an option and since ARM devices don't have much memory, why not use "-O0" if we can.
This equates to CFLAGS="-Wall -O0 -U_FORTIFY_SOURCE -fstack-protector-all"
(seen on line #21)
]]><![CDATA[CLI Converting HD > SD]]>2014-05-31T22:37:32-07:00http://www.pnd4.net/blog/2014/05/31/cli-converting-hd-sdAfter purchasing a paintball web-series I was a little disappointed to find my loot only available in 1080p. At about ~$4 an episode, you'd think they'd at least offer at least 1 other format, possibly for the old iPod Video's or in my case, an old netbook streaming media off my NAS via 802.11g.
In any case, doing the deed myself was surprising easy. Though I'd imagine someone without any prior knowledge of codecs, aspect ratio, and bitrate may run into trouble. I'd suggest they give my commands a shot.
Lets start off by making sure we have ffmpeg installed on the buffest rig you've got. This can be preety heavy lifting and can take quite sometime on older machines.
Now assuming we have our original file EP1_HD_1080p.mov in our current directory, running the following command will get us going.
Now you may have checked out some examples before mine and noticed others' had a lot more options. It just goes to show that ffmpeg is the go-to utility. Whether small job like mine or the demands of a release-group like "YIFY", you can't go wrong.
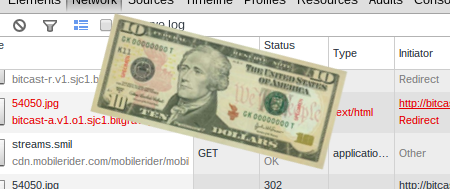
After 'inspecting' the source of a live webcast and the data that gets thrown around once the plugin is launched, I managed to get a 10$ webcast for free. To be honest, I feel like I just got lucky with this one.. While media is still woven into websites with embed tags as it was back when Geocities was booming, where besides the scrolling marquee we all insisted on looping our favorite song in the background, but this time theres all sorts of new protocols, plugins, and codecs at work. We can't just 'view-source' and expect to see 10-dollars-worth-of.mp4. There's nothing to worry about though, we only have to dig a little harder. Probably real hard if you're like me and have never had much experience with media plugins.. So lets get to it.
First, you're going to want to check out the source of the page where the plugin and stream play. Your browser's developer tools come in real handy and should have everything you need for sleuthing around.
Right now we just need to take note of the vendorID and mediaID parameters. Both were mentioned at least a few times thoughout the page I was working with.
Next we want to examine the SMIL file which will tell us exactly where we can find our stream. I found mine by using Firefox's network console and paying attention to the back-and-forth dialog going on between the browser's plugin and the webcast host. I suspect if you did the same you'd come up with similar, so here's mine to save you the trouble.
In the output of the previous command here should be a couple key-value pairs like content="http://yadayada.yup" and src="/theStreamsUWereLookinFor@rightHurr" to help you put together a URI to pass to your chosen media player.
This URI is direct access to the stream, but if it returns an error or otherwise you're going to need to invesigate further. My hope is that I've at least set you on the right foot toward success. As a final clue, here's what my result would've looked like using the example values I've used thus far.
If you're wondering the origin of the parts of the URI not supplied explicitly in the SMIL, they were taken from a previous URI from the same site, before they started asking for money.
]]><![CDATA[Optimizing a Pogoplug]]>2014-04-20T04:46:00-07:00http://www.pnd4.net/blog/2014/04/20/optimizing-a-pogoplug
Here's a few tips on how to maximize your performance when using an embedded device like Pogoplug, RaspberryPi, etc. *
Flash-Drive I/O
Flash memory is cheap and small. Most even have enough storage space that you can house your ROOTFS pretty comfortably. The downside is pretty sluggish reads/writes. Fortunately the pogoplug has 256MB's of RAM; By allocating some commonly written directories in RAM we gain speed plus the benefit of less write-cycles overall to our flash-memory. If you don't already know, flash memory has a limited number of writes, so this effectively prolongs the life of your drive/system.
Simply add/replace the appropriate lines to fstab ..
The logic that is behind your drive/disk access can be tweaked reducing lag by appending the following line to /etc/rc.local
1
echo deadline > /sys/block/sda/queue/scheduler
Note That I don’t use the noop scheduler because deadline can be better as it group small accesses, which improve latency. The default, cfq is better suited for disk-drives.
]]><![CDATA[Dual-Monitor Toggle]]>2014-04-03T02:07:00-07:00http://www.pnd4.net/blog/2014/04/03/dual-monitor-toggleRecently I found myself in need of a way to switch X into single-monitor mode without having to kill the running instance of X, which is fine if you don't have any unsaved work, since it crashes all programs running within X as well.
xrandr
Using xrandr[^1] we are able to dynamically modify our desktop's properties.
]]><![CDATA[CLI RTMP Streaming]]>2013-11-23T00:00:00-08:00http://www.pnd4.net/blog/2013/11/23/rtmpdumpAs of 2013, some streams require the 'ksv'/'k-s-v' patch.. Arch users can use rtmpdump-ksv instead of rtmpdump
RasPi community has good info on the subject. Should be valid for Pogoplugs too.
A few recommendations I have for streaming USB webcams with linux:
Unless you need the capabilities of motion (that is, you are using the motion detection built in to motion) use mjpgstreamer instead of motion. Motion processes each image to see if pixels have changed, and by default runs a lot of binary morphology on the images (erode, dilate, etc), where mjpgstreamer just streams. On my Pogoplus with four cameras this means the difference between 60%+ cpu utilization versus single digits (and to get down to 60% I had to drop the framerate to 2Hz and go through a bunch of options to turn off as much processing as possible). I have another machine running zoneminder which processes my streams which is why I don't mind forgoing motion detection.
Use MJPEG instead of YUV
If you want multiple webcams on a single USB bus this is basically a necessity. Even if you don't it means a lot less data to process. This is the default in mjpgstreamer, in motion set: "v4l2palette 2" in motion.conf
Get a webcam with known support
Some webcams have a problem where the request a lot more bandwidth than they need and this means you can't use two at the same time. There is a hack to get around this in YUV mode, but not MJPEG which isn't much of a help. If you are up for hacking the driver yourself it should be possible to skip the BW check and make these work anyway, but that is quite a bit of work.
Cameras that work simultaneously (no bandwidth bug):
-Logitech C120
-Logitech C160
-Logitech B500
-Logitech Quickcam E 3500
-Logitech Quickcam Messenger
-Microsoft HD-3000
-Microsoft HD-5000
-Rocketfish HD Webcam Pro
Cameras that do not work in multiples (bandwidth bug?):
-Logitech C110
-Logitech C310
-Creative Live! Cam Video IM Ultra
-HP 2-Megapixel Webcam (RZ406AA)
My current recommendation is probably the HD-3000. It is 720p and can be found for about $20. It does NOT have autofocus which I think is good for a webcam you leave running 24/7. I tried the HD-5000 and it spends a lot of time refocusing. I'm afraid it would break after a few weeks. The C160 is currently the cheapest, about $8 shipped on ebay. Meritline sometimes sells it for $6. The irritating thing about the c120/c160 is that they have a focusing ring you have to adjust. For a security camera I would prefer fixed focus. I buy any webcam I can get at a firesale so I'll keep trying more - I would appreciate results from anyone else as well.
EDIT: Added a few more cameras]
It turns out you can disable autofocus on UVC supported webcams like this:
v4l2-ctl –verbose –set-ctrl=focus_auto=0
At least it works for me on all the AF cameras I have to test (Microsoft & Rocketfish).
Not only is this a good idea for camera longevity (I would think so at least) it helps prevents false motion alarms.
]]><![CDATA[Gentoo - Genkernel Upgrade Steps]]>2013-11-09T00:00:00-08:00http://www.pnd4.net/blog/2013/11/09/gentoo-genkernel-upgradeI use genkernel to install my kernel.. this isn't the best way to do things but for now it gets the job done. Gentoo isn't my primary distro so I sometimes forget the steps to go through when they push a new kernel.
Make sure Gentoo is matched up with your target kernel version
12
eselect kernel list
eselect kernel set #
Build it
1234567
zcat /proc/config.gz > /usr/src/linux
cd /usr/src/linux
make oldconfig
make modules_prepare
emerge --ask @module-rebuild
make
make modules_install
Install it
1
genkernel --no-menuconfig --no-clean --install all
Update bootloader
1
vim /boot/extlinux/extlinux.conf
Reboot and cross your fingers.
Clean-up/delete old files in /boot and corresponding bootloader entries.
]]><![CDATA[IPTables + Transmission + VPN]]>2013-11-04T00:00:00-08:00http://www.pnd4.net/blog/2013/11/04/iptables-transmission-vpnTransmission doesn't have a way to bind to specific interfaces without patching, and I like the simplicity of using a package manager like 'pacman' vs patching 'BindInterface' into Transmission and building it from source. The work-around, since Transmission can bind to an IP, is to run a script with cron periodically.
The script should basically:
first make sure the VPN is up and operational
correct transmission's config if the address isn't current.. [stop, edit, start]
definitely end with transmission running
Quote
Enforcing an application, for example a torrent client like Transmission, to always use the VPN interface or any particular network interface for that matter, is trivially simple using iptables on Debian, Ubuntu or any other GNU/Linux distro.
Personally, I am running Debian Sid on the Raspberry Pi. Occasionally I use it for downloading files ( legal stuff, seriously, believe me :D ) using Transmission Bittorrent client over a VPN connection. Sometimes it happens that the VPN connection fails and doesn't reconnect for whatever reason and Transmission continues pulling stuff directly over my internet connection, which I would like to avoid. Fortunately it is very straightforward to enforce rules based on application owner UID. Transmission runs under the owner debian-transmission in Debian (use htop to check this) and the following two lines of iptables ensures that any process with owner having UID, debian-transmission, will not use any other network interface apart from the OpenVPN tunnel interface tun0
The first line ensures that, my Mac-mini having IP address 192.168.0.100 on the lan, can always access the web interface of transmission. The second line makes sure, no outgoing traffic can leave via anything other that tun0.
Peace of mind restored, thanks to iptables.
Code
transmission-vpn-only.sh
Ver. ArchLinuxARM-110413
#!/bin/shiface="tun0"service="transmission.service"config="/var/lib/transmission/.config/transmission-daemon/settings.json"# test if service is currently running
systemctl --quiet is-active $serviceif[$? -eq 0];then# get the ip from the current configsavedIP=$(cat $config| egrep -o '\"bind-address-ipv4\": \"[^ ]*'| cut -d'"' -f4)# test if ip has changed and is no longer available
ping -i1 -w2 -c1 $savedIP >/dev/null
if[[$? -ne 0||"x$savedIP"=="x0.0.0.0"]];thenecho IP unavailable, stop and reconfigure transmission..
systemctl stop $service# test if VPN went down completely
ifconfig $iface >/dev/null
if[$? -ne 0];thenecho Oops.. $iface not available, exiting without restarting transmission..
exit 1
fi# reconfigure transmission with new ip address
sed -i "s/\"bind-address-ipv4\":.*\$/\"bind-address-ipv4\": \"$(ip a show dev $iface | egrep -o 'inet [^ ]* ' | cut -d' ' -f2 | sed 's/ //')\",/"$config
systemctl start $serviceecho Transmission started.
fielseecho"Transmission isn't running.."exit 1
fi
To-Do
Figure out how to 'BindInterface', if possible.
Revise transmission-vpn-only script.
Figure out why openvpn config leaves routes behind.
]]><![CDATA[Hostapd]]>2013-10-18T00:00:00-07:00http://www.pnd4.net/blog/2013/10/18/hostapdWireless access point daemon
Karma a version of hostapd for creating rogue access points.
NAT or Bridge
IP's must be handed out to the connecting clients so one or the other must be configured
NAT - creates a new subnet ".. with IP forwarding/masquerading and DHCP service (wireless clients will use a dedicated subnet, data from/to that subnet is NAT-ted – similar to a normal WiFi router that's connected to your DSL or cable modem)" – Archwiki
> see the Firewalls article
Bridge - ".. Simple, but it requires that any service that's needed by your wireless clients (like, DHCP) is available on your computers external interface. That means it will not work if you have a dialup connection (e.g., via PPPoE or a 3G modem) or if you're using a cable modem that will supply exactly one IP address to you via DHCP." –ArchWiki
> You need to create a network bridge and add your network interface (e.g. eth0) to it. You should not add the wireless device (e.g. wlan0) to the bridge; hostapd will add it on its own.
>
>If you use netctl, see Bridge with netctl for details (just do not add tap0 used in that example).
Configuration
System configuration is stored in /etc/hostapd/hostapd.conf.
To override at runtime:
sudo hostapd /path/to/hostapd.conf
#sets the wifi interface to use, is wlan0 in most cases
interface=wlan0
#driver to use, nl80211 works in most cases
driver=nl80211
#sets the ssid of the virtual wifi access point
ssid=dontMessWithVincentValentine
#sets the mode of wifi, depends upon the devices you will be using. It can be a,b,g,n. Setting to g ensures backward compatiblity.
hwmode=g
#sets the channel for your wifi
channel=6
#macaddracl sets options for mac address filtering. 0 means "accept unless in deny list"
macaddracl=0
#setting ignorebroadcastssid to 1 will disable the broadcasting of ssid
ignorebroadcastssid=0
#Sets authentication algorithm
#1 - only open system authentication
#2 - both open system authentication and shared key authentication
authalgs=1

#####Sets WPA and WPA2 authentication#####
#wpa option sets which wpa implementation to use
#1 - wpa only
#2 - wpa2 only
#3 - both
 wpa=3
#sets wpa passphrase required by the clients to authenticate themselves on the network
 wpapassphrase=KeePGuessinG
#sets wpa key management
 wpakeymgmt=WPA-PSK
#sets encryption used by WPA
 wpapairwise=TKIP
#sets encryption used by WPA2
 rsnpairwise=CCMP


#################################


#####Sets WEP authentication#####
#WEP is not recommended as it can be easily broken into
   wepdefaultkey=0
   wepkey0=qwert    #5,13, or 16 characters
#optionally you may also define wepkey2, wepkey3, and wep_key4


#################################
#For No encryption, you don't need to set any options
# config file to use with the Karma'd version of hostapd
# created by Robin Wood - robin@digininja.org - www.digininja.org

interface=tpl0
driver=nl80211
countrycode=US

ssid=AndroidAP
channel=3

wepdefaultkey=0
wepkey0=SecretPassword1234

# Both open and shared auth
authalgs=3

# no SSID cloaking
ignorebroadcastssid=0

# -1 = log all messages
loggersyslog=-1
loggerstdout=-1

# 2 = informational messages
loggersysloglevel=2
loggerstdoutlevel=2

# Dump file for state information (on SIGUSR1)
# example: kill -USR1 <pid>
dumpfile=/tmp/hostapd.dump
ctrlinterface=/var/run/hostapd
ctrlinterfacegroup=adm

# 0 = accept unless in deny list
macaddracl=0

# only used if you want to do filter by MAC address
acceptmacfile=/etc/hostapd/hostapd.accept
denymacfile=/etc/hostapd/hostapd.deny

# Finally, enable Karma
enablekarma=0

# Black and white listing
# 0 = white
# 1 = black
karmablack_white=1
[00:04:25] <Ferus> also thats why you git pull
[00:04:28] <Ferus> all the time
[00:04:29] <Ferus> lel
[00:04:33] <orik> xD
[00:04:57] * Ferus passes pnd4 an american spirit black
[00:04:59] <pnd4> hmm whats the diff between git pull and clone?
[00:05:00] <orik> well phoronix even has good things to say about mpv
[00:05:10] <orik> a pull just checks for changes and
[00:05:19] <Ferus> clone clones a new repo, pull pulls the new changes from master
[00:05:26] <orik> ^^
[00:05:27] <pnd4> oh ok.. thanks
[00:05:50] <orik> man I've been using git at work for the past three months and I swear I still don't fully understand it
[00:05:56] <Ferus> tl;dr if the repo doesnt exist locally, you clone from master, if it does exist locally, you pull from master
[00:06:19] <Ferus> orik: i've been using git for two years, i broke my repo 5 months ago and havent fixed it
[00:06:34] <Ferus> (i dont know how ;_;)
[00:07:41] <pnd4> ok so Ive cloned dwmstatus earlier, made changes. if I do a pull, does it undo my changes to match the current master?
[00:07:52] *** Joins: salam4ik (~salam4ik@89.106.233.158)
[00:08:10] * pnd4 copies directory and just tries it.. 'banzai!'
[00:08:21] <Ferus> no, it'll complain that you have un-stashed changed
[00:08:23] <Ferus> changes*
[00:08:39] <Ferus> so you want to do git stash; git pull; git stash pop[00:09:05] <pnd4> stash, thats a new one too.. did I mention I'm quite new to git ? haha.
[00:09:17] <Ferus> (this is all i know how to do)
[00:09:27] <Ferus> besides add and rm, but thats kinda obvious
[00:09:44] <pnd4> thanks. I'll try and remember that if/when suckless puts out a new version
[00:10:49] <pnd4> I think having familiarity with git should help in the job search.. I mean, who wouldn't want a guy that's familiar with widely used version control systems?
[00:10:49] <Ferus> you can always google it
[00:11:46] <pnd4> that is true, but the tl;dr versions are always nice
[00:12:52] <pnd4> Halts: ebay has the hat I want for 25 (down from 35$) .. they're out of my size.. I share your pain.
[00:14:05] <pnd4> its like that scene in 'The Last Samurai' where they cut his hair
[00:15:40] <Halts> at least you can buy your hat.
[00:16:01] <pnd4> would you buy your jersey still if it was 120 ?
[00:16:59] <Ferus> > IP Location: Kingston / New York / United States
[00:17:08] <Ferus> bahaha this site is horrible, cant even geolocate
[00:18:22] <Halts> haha, not right now.
[00:18:28] <Halts> but I eventually would, yes.
[00:18:40] <Halts> I'd like to get it for
[00:18:50] <Halts> but, a bunch of cunts ruined that
[00:19:57] *** Quits: orik (~orik@50-46-134-47.evrt.wa.frontiernet.net) (Remote host closed the connection)
[00:20:51] <n2o4> pnd4: Just checkout your features into it's own branch, for example git clone foobar, git checkout -b my-super-branch, make edits and commit, issue git checkout master to check into the master branch again.
]]><![CDATA[Markdown Template]]>2013-10-16T00:00:00-07:00http://www.pnd4.net/blog/2013/10/16/templateA template for markdown posts. Covers some frequently used syntax.
]]><![CDATA[Ruby Installation]]>2013-10-16T00:00:00-07:00http://www.pnd4.net/blog/2013/10/16/ruby-installRuby can be confusing to install. Make sure to plan out if per-user environments are going to be used, or system-wide (Ruby, Gems, etc installed by root).
Installing
Instead of using rvm or rbenv, stick to installing Ruby system-wide with pacman.
1
pacman -S ruby
Paths
Caution editing your .bashrc or .zshrc.. root does not need to have a GEM_HOME or ~/.gem/ruby/2.0.0 added to its PATH
~/.gemrc
For root, create .gemrc so that when gems are installed as root, it uses the system-wide directory.
1
gem: --no-user-install
Optionally, create user's .gemrc as well, although it'd be the same as in /etc/gemrc, which is automatically made by the ArchPkg
]]><![CDATA[Wifi Pinapple Mark 5]]>2013-10-16T00:00:00-07:00http://www.pnd4.net/blog/2013/10/16/pinapple-vAdvanced standalone pentesting tool for wireless networks.
Specs
12
AR9331 and RTL8187
16mb ROM / 64mb DDR2 RAM
Software
Available Pentest Packages include aircrack-ng, dsniff, easy-creds, ettercap, hping3, httptunnel, karma, kismet, macchanger, mdk3, ngrep, nmap, nodogsplash captive portal, privoxy, ptunnel, snort, sslsniff, sslstrip, ssltunnel, stunnel, tcpdump, tor, and reaver
]]><![CDATA[Firewalls]]>2013-10-16T00:00:00-07:00http://www.pnd4.net/blog/2013/10/16/firewallUse iptables to secure netlink infrastructure.
Where the rules files go
In Arch, the usual /etc/iptables/iptables.rules
In Gentoo, the rules are restored from /var/lib/iptables/rules-save
In Debian, wiki says to create /etc/network/if-pre-up.d/iptables (chmod +x)
Rules Basic Template
Based on: https://wiki.archlinux.org/index.php/SimpleStatefulFirewall
]]><![CDATA[DD-WRT Firewall Fine Tuning]]>2013-03-25T01:14:11-07:00http://www.pnd4.net/blog/2013/03/25/dd-wrt-firewall-fine-tuningTo add additional firewall rules via the DD-WRT web interface when there's no checkbox, navigate to web interface's section at [Administration] -> [Commands]
You should see a text box, there you can add individual iptables rules as if you were using the command line. Just save the command with the appropriate button labeled [Save Firewall]
I found this particularly useful for allowing a machine with a static IP ping a machine that drops ping requests. Here is the rule I added as an example
1
iptables -A INPUT -s <ip.allowed.pings> -p icmp -j ACCEPT